Mobiles
Fix Auto Rotation issues on Oneplus 7, 7pro, 7T & 7T pro – How to FIX Rotation Issues on Oneplus

Oneplus in past started Close beta testing for the Oneplus 7 Series for both OxygenOS 12 & ColorOS 12. ColorOS 12 files of Close beta were leaked and users flashed ColorOS 12 on global units with that there was no problem but the major problem occurred when users started to downgrade back to OxygenOS 11.
After downgrading every user who flashed ColorOS 12 or OxygenOS 12 they started facing issues with Auto rotation on Oneplus 7 Series So after long research, we finally manage to fix the auto Rotation issue but the process is complicated and it’s not recommended to try until you have sufficient knowledge about what you are doing. (Note: We are not responsible if anything happens to the device & Never use someone else persist you will end up HARDBRICK)
Prerequisites to Fix Auto rotation issue on Oneplus 7 Series.
- Adb/Fastboot driver: Follow the guide
- MSM tool/Unbrick Tool: Download here
- ImHex from github: Download
- Unlocked Bootloader: Guide to Unlock Bootloader of Oneplus 2022 – A video guide to Unlock the bootloader
- Oneplus 7 & 7 pro Lineage OS recovery (Required Only for Oneplus 7 & 7 Pro to boot in FASTBOOTD): Oneplus 7 Download Recovery Direct link – Official links // Oneplus 7 Pro Download Direct Link – Official Links
Steps to Fix Auto Rotation issue on Oneplus 7 Series.
- First Extract Persist.img using MSM tool open MSM tool Press F8 and select persist (password is oneplus) Click on readback button
- Connect your phone in EDL mode by holding the volume down and up buttons same time (Refer here to know about EDL Mode), Wait for the status to be green, the persist image will be saved on your PC C: drive. Save Persist file its Important.
- Open & Edit persist.img in Hex Editor (ImHex) (Open as Administrator) Extract all strings from the img by clicking Extract on the right-hand side panel. Filter strings for lsm6dsm_0_platform.orient. You will find two strings (Maybe only one, maybe more than two) with the name – {“lsm6dsm_0_platform.orient” : “owner”…….,. Click on it, and change it all to the value. Note: Try at your own risk, don’t play around with values Oneplus 7, Oneplus 7 pro & Oneplus 7T have the same values but Oneplus 7Tpro has different values Follow the video guide given below. (To change 1 to 0 double click on it and enter 30, y to x by entering 78, x to y by entering 79, – sign to + sign by entering 2B)

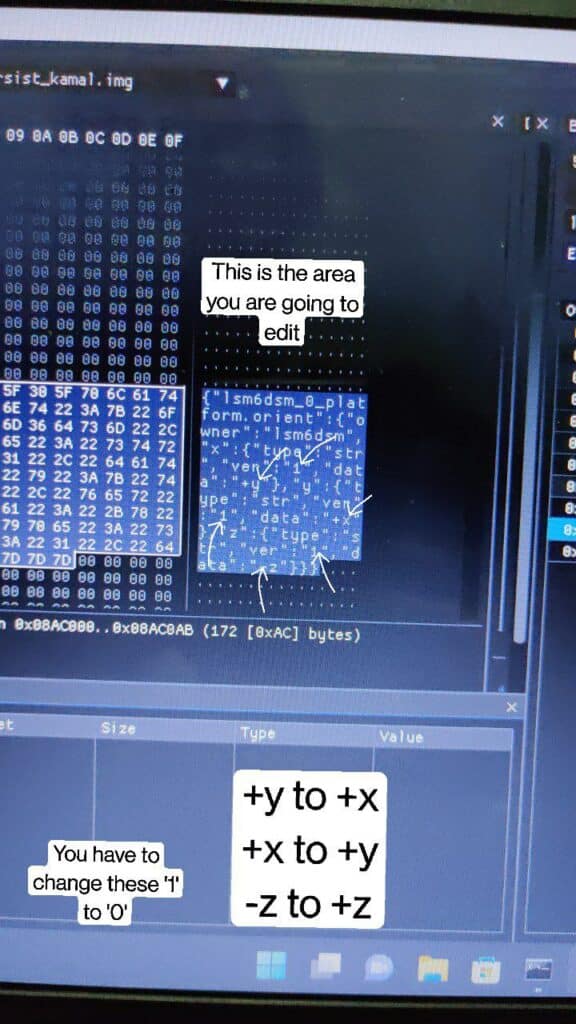
Oneplus 7, 7Pro & 7T Value which needs to be Changed

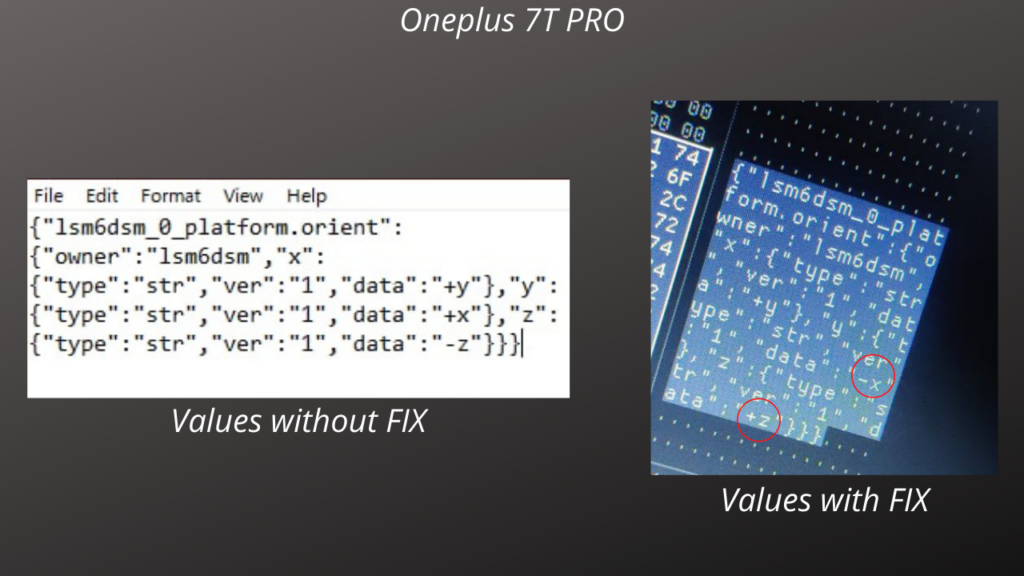
Oneplus 7T pro only required to + & – Sign
- Save edit Persist (Save As) any Name eg: Newpersist & Close Hex Editor (ImHex).
- After saving maybe you’ll see that the edited persist could be in the size of like 49MB, but you’ll need it as 32MB approx to flash. So we need to resize the edited file. For that File > Open File > Select the edited persist which is 49MB. Open {“lsm6dsm_0_platform.orient” : “owner”…
- Right click > Resize > Resize it to 2000000 > set.
- Your persist will automatically change its size to 32MB.
- Now it’s time to Flash-edited Persist.
- Copy edited persist to Adb folder or Platform-tools folder
- Open command prompt in adb folder or platform-tools folder
- If you have Oneplus 7 & 7pro (Enable USB Debugging on your Smartphone Note: Bootloader should be Unlocked) we need to use a custom recovery to boot into fastbootd mode (Use lineage recovery links given above)
- If you have Oneplus 7T & 7T pro (Enable USB Debugging on your Smartphone Note: Bootloader should be Unlocked) you can directly boot into fastbootd by giving the command (Adb reboot bootloader), Once device boots into fastboot mode give command (fastboot reboot fastboot) now device should boot into fastbootd.
- Finally, flash edited persist by giving the command (fasboot flash persist (edited persist name).img
- Reboot & Enjoy
Credit: Harald
Also read: Apex Legends Mobile Confirmed to get official Stable release this month on Both iOS and Android
If you like our article then follow us on Google news, and Instagram, or join our Telegram Group. For the latest TechNews and Reviews, follow Techibee on Twitter and Facebook, and subscribe to our Youtube channel.
For More Such Updates Follow Us On – Telegram, Twitter, Google News, WhatsApp and Facebook